React Populer Tools -- React 流行库
React Populer Tools -- React 流行库
- Styled Components
- React Hook Form
- React Spring
- React Query
- React Modal
- React Player
- React Datepicker
- React Table
1 Styled Components
1.1 概述
styled-components 允许开发者通过创建组件的方式为元素添加样式, 创建出来的组件叫做样式化组件。

npm install --save styled-components
yarn add styled-components
2
1.2 基本使用

// 创建样式化组件
import styled from "styled-components";

export const Wrapper = styled.div`
  padding: 30px;
  background: papayawhip;
`;

export const Title = styled.h1`
  font-size: 24px;
  color: palevioletred;
  text-align: center;
  margin: 0;
`;
2
3
4
5
6
7
8
9
10
11
12
13
14
// 使用样式化组件
function App() {
  return (
    <Wrapper>
      <Title>Hello, styled-components</Title>
    </Wrapper>
  );
}
2
3
4
5
6
7
8
1.3 根据属性适配样式

export const Button = styled.button`
  border: 2px solid palevioletred;
  border-radius: 3px;
  padding: 10px 15px;
  background-color: ${(props) => (props.primary ? "palevioletred" : "white")};
  color: ${(props) => (props.primary ? "white" : "palevioletred")};
`;
2
3
4
5
6
7
function App() {
  return (
    <>
      <Button primary>Primary Button</Button>
    	<Button>Primary Button</Button>
    </>
  );
}
2
3
4
5
6
7
8

export const Input = styled.input`
  border: none;
  border-radius: 3px;
  padding: 10px;
  background-color: papayawhip;
  color: ${(props) => props.color || "palevioletred"};
`;
2
3
4
5
6
7
function App() {
  return (
    <>
      <Input defaultValue="Hello" type="text" color="rebeccapurple" />
      <Input defaultValue="styled-components" type="text" />
    </>
  );
}
2
3
4
5
6
7
8
1.4 扩展样式化组件

export const Button = styled.button`
  color: palevioletred;
  background-color: #fff;
  font-size: 18px;
  padding: 15px 20px;
  border: 2px solid palevioletred;
  border-radius: 3px;
`;

export const TomatoButton = styled(Button)`
  color: tomato;
  border-color: tomato;
`;
2
3
4
5
6
7
8
9
10
11
12
13
import { Button, TomatoButton } from "./components/Wrapper";

function App() {
  return (
    <>
      <Button>Button</Button> <TomatoButton>TomatoButton</TomatoButton>
    </>
  );
}
2
3
4
5
6
7
8
9
1.5 为任何组件设置样式
styled 方法不仅可以创建样式化组件,它还可以为普通的 React 组件设置样式。
import styled from "styled-components";

const Link = ({ className, children }) => {
  return (
    <a href="http://www.example.com" className={className}>
      {children}
    </a>
  );
};

const StyledLink = styled(Link)`
  color: palevioletred;
  font-weight: bold;
`;
2
3
4
5
6
7
8
9
10
11
12
13
14
2. React Hook Form
2.1 概述
React Hook Form 是 React 生态圈中最为流行的表单构建工具,用于简化 React 表单代码复杂冗余的问题。

npm install react-hook-form
2.2 基本使用
import { useForm } from "react-hook-form";

function App() {
  const { register, handleSubmit, watch } = useForm({
    defaultValues: {
      username: "张三",
      isAgree: true,
      hobbies: [],
      gender: "男",
      transport: "",
    },
  });
  const onSubmit = handleSubmit((data) => {
    console.log(data);
  });

  const username = watch("username");
  useEffect(() => {
    console.log(username);
  }, [username]);

  return (
    <form onSubmit={onSubmit}>
      <input type="text" {...register("username")} />
      <input type="checkbox" {...register("isAgree")} />
      <input type="checkbox" value="足球" {...register("hobbies")} />
      <input type="checkbox" value="篮球" {...register("hobbies")} />
      <input type="radio" value="男" {...register("gender")} />
      <input type="radio" value="女" {...register("gender")} />
      <select {...register("transport")}>
        <option value="">请选择交通工具</option>
        <option value="火车">火车</option>
        <option value="飞机">飞机</option>
        <option value="自驾">自驾</option>
      </select>
      <button type="submit">提交</button>
    </form>
  );
}

export default App;
2
3
4
5
6
7
8
9
10
11
12
13
14
15
16
17
18
19
20
21
22
23
24
25
26
27
28
29
30
31
32
33
34
35
36
37
38
39
40
41
2.3 表单验证
表单验证支持以下字段:required、min、max、minLength、maxLength、pattern、validate
import { useForm } from "react-hook-form";

function App() {
  const { formState: { errors } } = useForm({
     // 控制触发表单验证的时机
    // onSubmit onBlur onTouched onChange all
    mode: "onChange",
  });
  // 表单提交触发表单验证, 表单提交后触发表单实时验证
  const onSubmit = handleSubmit((data) => {
    // 在表单验证没有通过的情况下是不会调用该回调函数的
  });

  // 注册用户名字段
  const usernameRegister = register("username", {
    required: "用户名不能为空",
    maxLength: {
      value: 6,
      message: "用户名最大长度是6",
    },
    pattern: {
      value: /^[A-Za-z]+$/i,
      message: "用户名只能包含字母",
    },
  });

  return (
    <form onSubmit={onSubmit}>
      <input type="text" {...usernameRegister} />
      {errors.username && <span>{errors.username.message}</span>}
      <button type="submit">提交</button>
    </form>
  );
}
2
3
4
5
6
7
8
9
10
11
12
13
14
15
16
17
18
19
20
21
22
23
24
25
26
27
28
29
30
31
32
33
34
import { useForm } from "react-hook-form";

function App() {
  const { watch } = useForm({
    // 设置表单控件的默认值
    defaultValues: {
      password: "",
      rePassword: "",
    },
  });

  return (
    <form onSubmit={onSubmit}>
      <input
        type="password"
        {...register("password", {
          pattern: {
            value: /^[A-Za-z0-9]+$/,
            message: "密码必须是数字或字母",
          },
        })}
      />
      {errors.password?.message}
      <input
        type="password"
        {...register("rePassword", {
          validate: (value) =>
            value === watch("password") || "两次密码输入不一样",
        })}
      />
      {errors.rePassword?.message}
      <button type="submit">提交</button>
    </form>
  );
}
2
3
4
5
6
7
8
9
10
11
12
13
14
15
16
17
18
19
20
21
22
23
24
25
26
27
28
29
30
31
32
33
34
35
2.4 设置表单值
import { useForm } from "react-hook-form";

function App() {
  const { setValue, reset } = useForm({
    // 设置表单控件的默认值
    defaultValues: {
      username: "",
      isAgree: false,
    },
  });

  const onClickHandler = () => {
    // 设置单个表单控件的值
    // setValue("username", "张三");
    // 同时设置多个表单控件的值
    reset({ username: "张三", isAgree: true });
  };

  return (
    <form onSubmit={onSubmit}>
      <input type="text" {...register("username")} />
      <input type="checkbox" {...register("isAgree")} />
      <button type="button" onClick={onClickHandler}>设置表单值</button>
    </form>
  );
}
2
3
4
5
6
7
8
9
10
11
12
13
14
15
16
17
18
19
20
21
22
23
24
25
26
2.5 useFormContext
通过 useFormContext 可以获取到表单上下文。
在表单内部有嵌套结构的情况下,将表单上下文作为 props 传递非常不方便。
import { FormProvider, useForm, useFormContext } from "react-hook-form";

function App() {
  const methods = useForm({
    defaultValues: {
      username: "",
      password: "",
    },
  });
  const onSubmit = methods.handleSubmit((data) => {
    console.log(data);
  });
  return (
    <FormProvider {...methods}>
      <form onSubmit={onSubmit}>
        <input type="text" {...methods.register("username")} />
        <Password />
        <button type="submit">提交</button>
      </form>
    </FormProvider>
  );
}

function Password() {
  const { register } = useFormContext();
  return <input type="password" {...register("password")} />;
}
2
3
4
5
6
7
8
9
10
11
12
13
14
15
16
17
18
19
20
21
22
23
24
25
26
27
3. React Spring
npm install react-spring@9.4.3 styled-components@5.3.3
<link rel="stylesheet" href="https://cdn.jsdelivr.net/npm/bulma@0.9.2/css/bulma.min.css" />
useSpring
// 创建单元素动画, 将元素从一个状态转换为另一个状态
useSprings
// 创建多元素动画, 将多个元素同时从一个状态转换为另一个状态
useTrail
// 创建多元素动画, 多个元素的动画依次执行
useTransition
// 创建入场、离场动画, 可以是单元素入场、离场动画,也可以是多元素入场离场动画
2
3
4
5
6
7
8
3.1 useSpring

import { useSpring, animated } from "react-spring";
import { useState } from "react";

function App() {
  const [toggle, setToggle] = useState(false);
  const styles = useSpring({
    backgroundSize: toggle ? "150%" : "100%",
  });
  return (
    <animated.div
      onMouseEnter={() => setToggle(true)}
      onMouseLeave={() => setToggle(false)}
      style={{
        width: 300,
        height: 300,
        backgroundImage:
          "url(https://images.pexels.com/photos/3227984/pexels-photo-3227984.jpeg?auto=compress&cs=tinysrgb&dpr=1&w=500)",
        backgroundPosition: "center center",
        ...styles,
      }}
    ></animated.div>
  );
}

export default App;
2
3
4
5
6
7
8
9
10
11
12
13
14
15
16
17
18
19
20
21
22
23
24
25

import { useSpring, animated } from "react-spring";

function App() {
  const { count } = useSpring({
    from: {
      count: 0,
    },
    to: {
      count: 556,
    },
    config: {
      duration: 2000,
    },
  });
  console.log(count);
  return (
    <animated.div style={{ fontSize: 54 }}>
      {count.to((count) => count.toFixed(2))}
    </animated.div>
  );
}

export default App;
2
3
4
5
6
7
8
9
10
11
12
13
14
15
16
17
18
19
20
21
22
23

import styled from "styled-components";
import { useSpring, animated } from "react-spring";
import { useRef } from "react";

const data = [
  "Cras justo odio",
  "Dapibus ac facilisis in",
  "Morbi leo risus",
  "Porta ac consectetur ac",
  "Vestibulum at eros",
  "List group item heading",
  "Something else here",
  "Separated link",
  "Another action",
  "Extra small button",
  "Signed in as Mark Otto",
  "This is a simple hero unit",
];

const Container = styled(animated.div)`
  width: 240px;
  height: 100px;
  overflow: auto;
  background-color: skyblue;
  padding: 0 10px;
  color: #fff;
  & > div {
    height: 30px;
    line-height: 30px;
  }
`;

function App() {
  const ref = useRef(null);
  const { scroll } = useSpring({
    scroll: ref?.current?.scrollTop || 0,
  });
  return (
    <>
      <Container ref={ref} scrollTop={scroll}>
        {data.map((item) => (
          <div key={item}>{item}</div>
        ))}
      </Container>
      <button
        onClick={() =>
          scroll.start({
            from: { scroll: ref.current.scrollTop },
            to: { scroll: 0 },
          })
        }
      >
        scrollToTop
      </button>
    </>
  );
}

export default App;
2
3
4
5
6
7
8
9
10
11
12
13
14
15
16
17
18
19
20
21
22
23
24
25
26
27
28
29
30
31
32
33
34
35
36
37
38
39
40
41
42
43
44
45
46
47
48
49
50
51
52
53
54
55
56
57
58
59
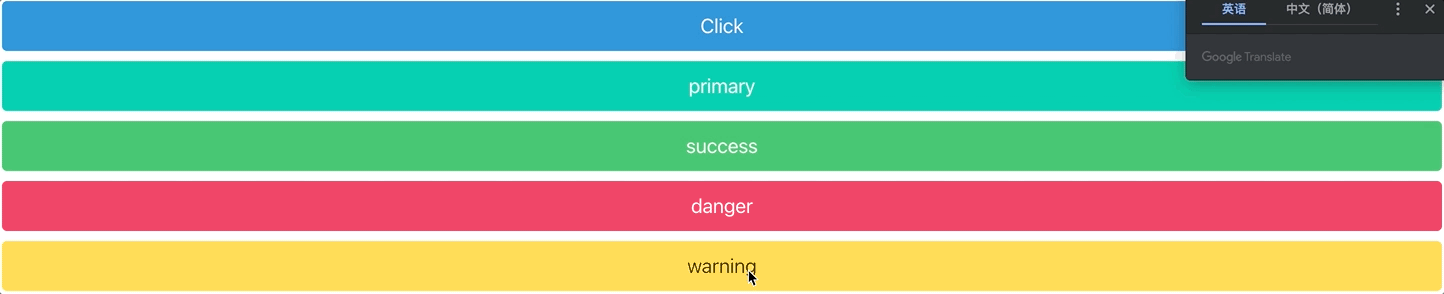
3.2 useSprings
创建多元素动画。
import { useState } from "react"
import { animated, useSprings } from "react-spring"

const data = ["primary", "success", "danger", "warning"]

function App() {
  const [on, setOn] = useState(false)
  const animations = useSprings(
    data.length,
    data.map((item, index) => {
      return {
        from: {
          transform: `translateX(${index % 2 === 0 ? -110 : 110}%)`
        },
        to: {
          transform: "translateX(0%)"
        },
        // 控制动画执行方向
        // false: from -> to
        // true: to -> from
        // 当 on 状态发生变化后会触发动画执行
        reverse: on
      }
    })
  )
  return (
    <div className="container">
      <button onClick={() => setOn(!on)} className="button mt-2 is-fullwidth is-info"> Click </button>
      <ul>
        {data.map((item, index) => (
          <animated.li style={animations[index]} key={item}>
            <button className={`button mt-2 is-fullwidth is-${item}`}>
              {item}
            </button>
          </animated.li>
        ))}
      </ul>
    </div>
  )
}

export default App
2
3
4
5
6
7
8
9
10
11
12
13
14
15
16
17
18
19
20
21
22
23
24
25
26
27
28
29
30
31
32
33
34
35
36
37
38
39
40
41
42
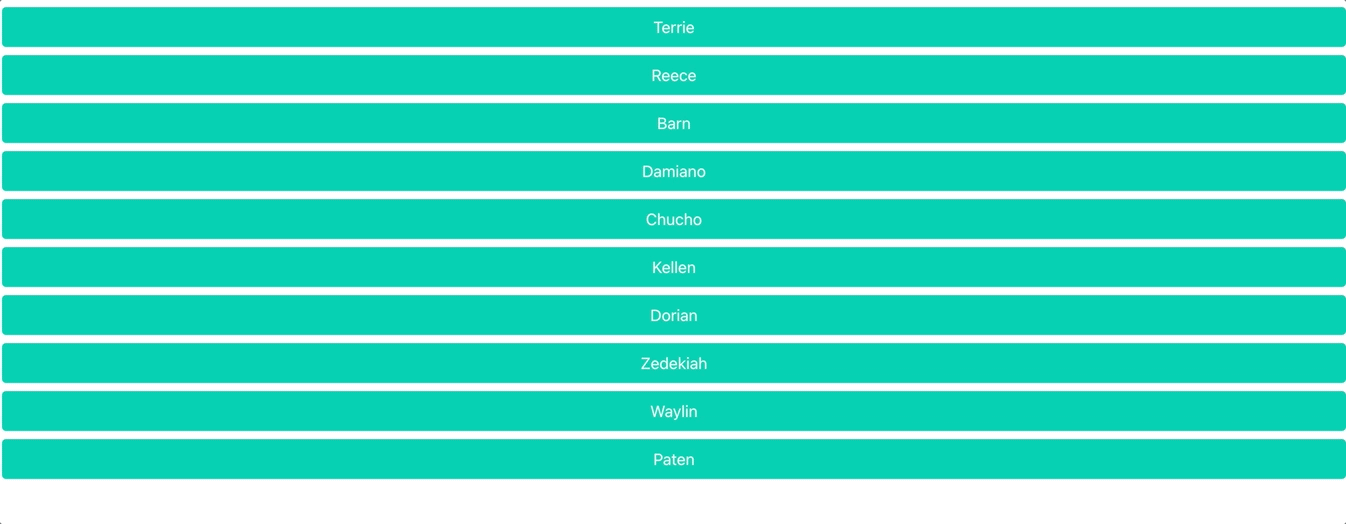
3.3 useTrail
创建交错动画,先创建动画,根据动画创建执行动画的元素。
import { useTrail, animated, config } from "react-spring";
import { useState } from "react";
import mock_data from "./MOCK_DATA.json";

function App() {
  const [{ dataToShow, indexStartRender }, setState] = useState({
    dataToShow: mock_data,
    indexStartRender: 0,
  });
  const animations = useTrail(dataToShow.length, {
    from: {
      transform: "translateY(100%)",
    },
    to: {
      transform: "translateY(0%)",
    },
    // 动画执行完成后重置, 以便再次执行动画
    reset: true,
    // config.wobby 为预置动画形式
    config: config.wobbly,
  });
  const onClickHandler = (index) => {
    const newData = [
      ...dataToShow.slice(0, index),
      ...dataToShow.slice(index + 1),
    ];
    setState({
      dataToShow: newData,
      indexStartRender: index,
    });
  };
  return (
    <div className="container">
      {dataToShow.map((item, index) => (
        <animated.button
          onClick={() => onClickHandler(index)}
          key={item.id}
          style={index >= indexStartRender ? animations[index] : null}
          className="button mt-2 is-fullwidth is-primary"
        >
          {item.first_name}
        </animated.button>
      ))}
    </div>
  );
}

export default App;
2
3
4
5
6
7
8
9
10
11
12
13
14
15
16
17
18
19
20
21
22
23
24
25
26
27
28
29
30
31
32
33
34
35
36
37
38
39
40
41
42
43
44
45
46
47
48
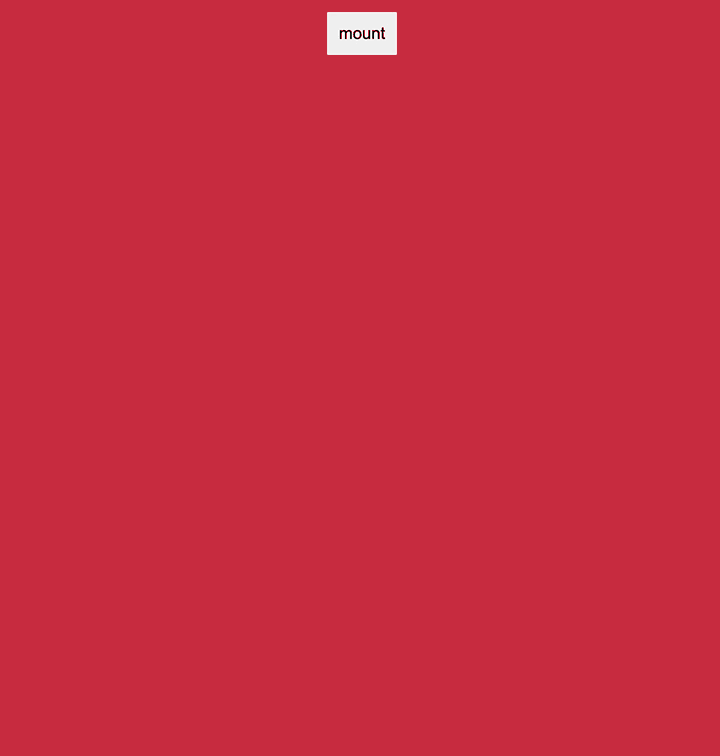
3.4 useTransition
创建入场动画和出场动画,可以是一个元素也可以是一组元素。

<div className="app">
  <button>button</button>
  <div className="container">
    <div className="item">item</div>
  </div>
</div>
2
3
4
5
6
import { useState } from "react"
import { animated, useTransition } from "react-spring"
import "./App.css"

function App() {
  const [isVisible, setIsVisible] = useState(false)
  const transition = useTransition(isVisible, {
    from: {
      opacity: 0,
      x: -300,
      y: 800
    },
    enter: {
      opacity: 1,
      x: 0,
      y: 0
    },
    leave: {
      opacity: 0,
      x: 300,
      y: 800
    }
  })
  return (
    <div className="app">
      <button onClick={() => setIsVisible(!isVisible)}>
       	{isVisible ? "卸载" : "挂载"}
      </button>
      <div className="container">
        {transition((style, item) => {
          return item ? (
            <animated.button className="item" style={style}></animated.button>
          ) : null
        })}
      </div>
    </div>
  )
}

export default App
2
3
4
5
6
7
8
9
10
11
12
13
14
15
16
17
18
19
20
21
22
23
24
25
26
27
28
29
30
31
32
33
34
35
36
37
38
39
40
import { useState } from "react"
import { animated, useTransition } from "react-spring"
import "./App.css"

function App() {
  const [items, setItems] = useState([])
  const transition = useTransition(items, {
    from: {
      opacity: 0,
      x: -300,
      y: 800
    },
    enter: item => ({ opacity: 1, x: 0, y: item.y, delay: item.delay }),
    leave: {
      opacity: 0,
      x: 300,
      y: 800,
    }
  })
  const onClickHandler = () => {
    setItems(prev =>
      prev.length
        ? []
        : [
            { y: -50, delay: 200 },
            { y: 0, delay: 400 },
            { y: 50, delay: 600 }
          ]
    )
  }
  return (
    <div className="app">
      <button onClick={onClickHandler}>{items.length ? "卸载" : "挂载"}</button>
      <div className="container">
        {transition((style, item) => {
          return item ? (
            <animated.div className="item" style={style}></animated.div>
          ) : null
        })}
      </div>
    </div>
  )
}

export default App
2
3
4
5
6
7
8
9
10
11
12
13
14
15
16
17
18
19
20
21
22
23
24
25
26
27
28
29
30
31
32
33
34
35
36
37
38
39
40
41
42
43
44
45
import { useState } from "react"
import { animated, useTransition } from "react-spring"
import "./App.css"
function App() {
const [items, setItems] = useState([])
const transition = useTransition(items, {
from: {
opacity: 0,
x: -300,
y: 800,
width: 20,
height: 20
},
enter: item => async next => {
await next({ opacity: 1, y: item.y, delay: item.delay })
await next({
x: 0,
width: 100,
height: 100
})
},
leave: {
opacity: 0,
x: 300,
y: 800
}
})
return (
<div className="app">
<button
onClick={() =>
setItems(prev => {
return prev.length
? []
: [
{ y: -50, delay: 200 },
{ y: 0, delay: 400 },
{ y: 50, delay: 600 }
]
})
}
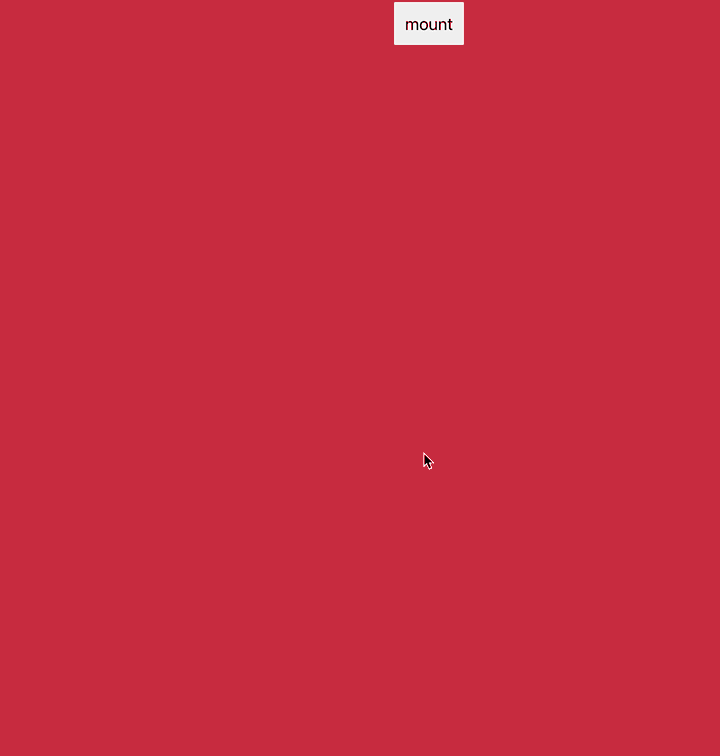
>
{items.length ? "un-mount" : "mount"}
</button>
<div className="container">
{transition((style, item) => {
return item ? (
<animated.div className="item" style={style}></animated.div>
) : null
})}
</div>
</div>
)
}
export default App
2
3
4
5
6
7
8
9
10
11
12
13
14
15
16
17
18
19
20
21
22
23
24
25
26
27
28
29
30
31
32
33
34
35
36
37
38
39
40
41
42
43
44
45
46
47
48
49
50
51
52
53
54
55
56
57
4. React Query
4.1 概述
React Query 使 React 应用获取,缓存,同步和更新服务端状态变得轻而易举。
请求管理
在适当时机自动向服务端发送请求以同步状态。适当时机是指当请求出错时,网络重新连接时,浏览器窗口重新获取焦点时。
它是基于请求库上层的封装,实现了和请求相关的逻辑, 比如无限加载,失败重试,轮询,请求状态查询等。
它不生产请求,它只是请求的搬运工。
状态管理
将服务端状态同步到客户端的内存中进行缓存,任何组件都可以从缓存中获取状态,从而实现全局状态共享。
下载:yarn add react-query@3.16.0
4.2 状态模拟
本地安装状态模拟工具
yarn add json-server创建 db.json 本地状态库
{
  "todos": [
    {
      "id": 1,
      "title": "吃饭",
      "isCompleted": true,
      "isEditing": false
    },
    {
      "id": 2,
      "title": "睡觉",
      "isCompleted": true,
      "isEditing": false
    },
    {
      "title": "打豆豆",
      "isCompleted": false,
      "isEditing": false,
      "id": 3
    }
  ],
   "posts": [
    {
      "id": 1,
      "title": "Hello React Query"
    },
    {
      "id": 2,
      "title": "React Query is Great"
    }
  ]
}
1
2
3
4
5
6
7
8
9
10
11
12
13
14
15
16
17
18
19
20
21
22
23
24
25
26
27
28
29
30
31
32在
package.json文件中添加命令"scripts": { "json-server": "json-server --watch db.json --port 3001" }1
2
3启动程序
npm run json-server
4.3 全局配置
- React Query 会在客户端的内存中缓存状态,任何组件都可以从缓存中获取状态
- 组件可以通过
queryClient对象操作内存中的缓存状态 - 开发者需要在应用的入口文件中通过
QueryClient类创建queryClient对象 - 开发者需要通过
QueryClientProvider组件将queryClient对象传递到下层组件 - 组件通过
useQueryClient钩子函数获取queryClient对象
import ReactDOM from "react-dom"
import App from "./App"
import axios from "axios"
import { QueryClient, QueryClientProvider } from "react-query"

// 响应拦截器, 让开发者直接获取到服务器端返回的数据
axios.interceptors.response.use(response => response.data)
axios.defaults.baseURL = "http://localhost:3001"

// 创建 queryClient 对象
const queryClient = new QueryClient()

ReactDOM.render(
  {/* 将 queryClient 对象传递到下层组件 */}
  <QueryClientProvider client={queryClient}>
    <App />
  </QueryClientProvider>,
  document.getElementById("root")
)
2
3
4
5
6
7
8
9
10
11
12
13
14
15
16
17
18
19
4.4 useQuery 同步服务端状态
1. 基本使用
在组件挂载完成后发送请求获取状态,缓存状态。
获取服务端默认待办事项列表。
// TodosMain.js 同步服务端状态待办事项列表
import axios from "axios"
import { useQuery } from "react-query"
import TodoItem from "./TodoItem"

async function fetchTodos() {
  try {
    return axios.get("/todos")
  } catch (err) {
    throw new Error("服务端默认待办事项加载失败")
  }
}

function TodosMain() {
  // useQuery(queryKey, queryFn)
  const { isLoading, isError, error, data } = useQuery("todos", fetchTodos)
  if (isLoading) return <div>正在加载服务端默认待办事项</div>
  if (isError) return <div>{error.message}</div>
  return (
    <section className="main">
      <ul className="todo-list">
        {data.map(todo => <TodoItem key={todo.id} todo={todo} />)}
      </ul>
    </section>
  )
}

export default TodosMain
2
3
4
5
6
7
8
9
10
11
12
13
14
15
16
17
18
19
20
21
22
23
24
25
26
27
28
4. 配置选项
1. retry
在请求发生错误时,默认会重试 3 次,如果请求还是不成功 isError 为真。
可以通过 retry 配置项更改重试次数或者禁用重试 ( false )。
useQuery("todos", fetchTodos, { retry: 2 })
2. refetchOnWindowFocus
当浏览器窗口重新获取焦点时,重新向服务器端发送请求同步最新状态。
在状态未更新之前,组件中显示缓存状态。
可以通过 refetchOnWindowFocus 配置项禁用此行为。
useQuery("todos", fetchTodos, { refetchOnWindowFocus: false })
3. enabled
默认值为 true,即组件挂载完成后发送请求同步服务端状态。当值为 false 的时候此行为被禁止,当值被改为 true 时,发送请求同步服务端状态。
const [isLoad, setIsLoad] = useState(false)
useQuery("todos", fetchTodos, { enabled: isLoad })
<button onClick={() => setIsLoad(true)}>同步状态</button>
data && data.map
2
3
4
4. staleTime
状态的保质期。在同步状态时,如果状态仍然在保质期内,直接从缓存中获取状态,不会在后台发送真实的请求来更新状态缓存。
useQuery("todos", fetchTodos, { staleTime: 5000 })
// 每次状态同步完成后都会有5秒的保质期
2
5. placeholderData
在服务端状态没有加载完成前,可以使用占位符状态填充客户端缓存以提升用户体验。
useQuery("todos", fetchTodos, { placeholderData: [ { id: 1, title: "吃饭" } ] })
6 refetchInterval
指定轮询的间隔时间,false 为不轮询。
useQuery("todos", fetchTodos, { refetchInterval: 1000 })
5. queryKey
useQuery 方法的第一个参数,除可以使用字符串以外,还可以使用数组,实现查询时传递参数。
实现查询 ID 为 1 的待办事项列表。
import axios from "axios"
import { useQuery } from "react-query"

function getTodoById({ queryKey }) {
  try {
    return axios.get(`/todos/${queryKey[1]}`)
  } catch (err) {
    throw new Error("待办事项获取失败")
  }
}

function FetchTodoById() {
  const { data } = useQuery(["todo", 2], getTodoById)
  return (
    <div>
      <pre>{JSON.stringify(data, null, 2)}</pre>
    </div>
  )
}

export default FetchTodoById
2
3
4
5
6
7
8
9
10
11
12
13
14
15
16
17
18
19
20
21
useQuery({ queryKey: ["todo", 2], queryFn: getTodoById })
4.5 useMutation
修改状态,使用 useMutation 钩子函数,修改包括,删除,更新,添加。
实现添加待办事项。
// TodosHeader.js 添加待办事项
import axios from "axios"
import { useState } from "react"
import { useMutation } from "react-query"

async function addTodo(todo) {
  try {
    return axios.post("/todos", todo)
  } catch (err) {
    throw new Error("任务添加失败")
  }
}

function TodosHeader() {
  const [title, setTitle] = useState("")
  const { mutate } = useMutation(addTodo, {
    onSuccess() {
      setTitle("")
    }
  })
  return (
    <header className="header">
      <input
        value={title}
        onChange={event => setTitle(event.target.value)}
        onKeyUp={event => {
          if (event.code === "Enter") {
            mutate({ title, isCompleted: false, isEditing: false })
          }
        }}
      />
    </header>
  )
}

export default TodosHeader
2
3
4
5
6
7
8
9
10
11
12
13
14
15
16
17
18
19
20
21
22
23
24
25
26
27
28
29
30
31
32
33
34
35
36
4.6 QueryClient
1. 同步服务端缓存
实现在待办事项添加成功后更新客户端缓存以使组件展示出最新的待办事项列表。
import { useQueryClient } from "react-query"
const queryClient = useQueryClient()

useMutation(addTodo, {
    onSuccess() {
      // 使本地缓存中的 todos 状态无效, 重新发送请求同步状态。
      queryClient.invalidateQueries("todos")
    }
})
2
3
4
5
6
7
8
9
2. 操作客户端缓存
实现更改待办事项的是否已完成状态。
通过 setQueryData 方法可以手动设置客户端缓存数据。
import axios from "axios"
import { useMutation, useQueryClient } from "react-query"

async function modifyTodoCompleted({ id, isCompleted }) {
  try {
    return axios.patch(`/todos/${id}`, { isCompleted })
  } catch (err) {
    throw new Error("任务状态更改失败")
  }
}

function TodoCompleted({ todo }) {
  const queryClient = useQueryClient()
  const { mutate } = useMutation(modifyTodoCompleted, {
    onSuccess(response) {
      queryClient.setQueryData("todos", data =>
        data.map(todo => (todo.id !== response.id ? todo : response))
      )
    }
  })
  return (
    <input
      className="toggle"
      type="checkbox"
      checked={todo.isCompleted}
      onChange={event => {
        mutate({ id: todo.id, isCompleted: event.target.checked })
      }}
    />
  )
}

export default TodoCompleted
2
3
4
5
6
7
8
9
10
11
12
13
14
15
16
17
18
19
20
21
22
23
24
25
26
27
28
29
30
31
32
33
4.7 useQuery 同步客户端状态
实现计算未完成待办事项的数量。
当客户端内存中的状态发生变化后,所有使用 useQuery 同步该状态的组件都会得到更新。
// hooks/todos.js
// 1. 将同步服务端待办事项抽象成自定义钩子函数 useTodos
// 2. 分别在不同组件中调用钩子函数以获取待办事项列表
import { useQuery } from "react-query"
import axios from "axios"

async function fetchTodos() {
  try {
    return axios.get("/todos")
  } catch (err) {
    throw new Error("服务端默认待办事项加载失败")
  }
}

export function useTodos() {
  return useQuery("todos", fetchTodos)
}
2
3
4
5
6
7
8
9
10
11
12
13
14
15
16
17
import { useTodos } from "../hooks/todos"

function UnCompletedTodoCount() {
  const { data } = useTodos()
  return (
    <span className="todo-count">
      <strong>{data && data.filter(todo => !todo.isCompleted).length}</strong>
      item left
    </span>
  )
}

export default UnCompletedTodoCount
2
3
4
5
6
7
8
9
10
11
12
13
4.8 QueryObserver 状态订阅
通过 QueryObserver 可实现在任意组件中订阅状态,实现全局状态共享。
import { useQueryClient, QueryObserver } from "react-query"
import { useEffect, useState } from "react"

function UnCompletedTodoCount() {
  const queryClient = useQueryClient()
  const [todos, setTodos] = useState([])
  useEffect(() => {
    const todosObserver = new QueryObserver(queryClient, { queryKey: "todos" })
    const unsubscribe = todosObserver.subscribe(result => setTodos(result.data))
    return () => unsubscribe()
  }, [])
  return (
    <span className="todo-count">
      <strong>{todos && todos.filter(todo => !todo.isCompleted).length}</strong>{" "}
      item left
    </span>
  )
}

export default UnCompletedTodoCount
2
3
4
5
6
7
8
9
10
11
12
13
14
15
16
17
18
19
20
4.9 useQueries 并发同步状态
使用 useQueries 可以并行发送请求,所有结果得到以后返回给开发者。
实现并发加载待办事项列表和文章列表。
import { useQueries } from "react-query"
import axios from "axios"

async function fetchTodos() {
  try {
    return axios.get("/todos")
  } catch (err) {
    throw new Error("服务端默认待办事项加载失败")
  }
}

async function fetchPosts() {
  try {
    return axios.get("/posts")
  } catch (err) {
    throw new Error("文章列表加载失败")
  }
}

function Parallel() {
  const results = useQueries([
    {
      queryKey: "anotherTodos",
      queryFn: fetchTodos
    },
    {
      queryKey: "posts",
      queryFn: fetchPosts
    }
  ])
  return (
    <div>
      <pre>{JSON.stringify(results, null, 2)}</pre>
    </div>
  )
}

export default Parallel
2
3
4
5
6
7
8
9
10
11
12
13
14
15
16
17
18
19
20
21
22
23
24
25
26
27
28
29
30
31
32
33
34
35
36
37
38
4.10 useInfiniteQuery 分页
使用它可以实现和分页相关的逻辑。
import axios from "axios"
import { useInfiniteQuery } from "react-query"

async function fetchUser({ pageParam = 1 }) {
  try {
    return axios.get(`https://reqres.in/api/users?page=${pageParam}`)
  } catch (err) {
    throw new Error("用户状态同步失败")
  }
}

function LoadMore() {
  const {
    data,
    isLoading,
    isFetching,
    hasNextPage,
    fetchNextPage
  } = useInfiniteQuery("users", fetchUser, {
    getNextPageParam(current) {
      if (current.page < current.total_pages) {
        return current.page + 1
      }
    }
  })
  if (isLoading) return <div>用户状态正在加载中...</div>
  return (
    <div>
      <ul>
        {data.pages.map(page =>
          page.data.map(user => <li key={user.id}>{user.first_name}</li>)
        )}
      </ul>
      {hasNextPage && <button onClick={() => fetchNextPage()}>加载更多</button>}
      {isFetching && <div>更多状态加载中...</div>}
    </div>
  )
}

export default LoadMore
2
3
4
5
6
7
8
9
10
11
12
13
14
15
16
17
18
19
20
21
22
23
24
25
26
27
28
29
30
31
32
33
34
35
36
37
38
39
40
isLoading 只有初次加载时才会变为 true,通常用作首次加载数据时的加载状态。
isFetching 是只要发生加载行为就会变为 true,通过用作加载更多时的加载状态。
4.11 useIsFetching 全局加载状态
只要程序中有状态在同步,useIsFetching 钩子函数获取的结果就为 true,可以通过它实现全局加载状态的提示。
yarn add react-spinners@0.10.6 @emotion/react@11.1.5
import { PacmanLoader } from "react-spinners"
import { useIsFetching } from "react-query"
import { css } from "@emotion/react"

const loaderCss = css`
  position: absolute;
  left: 100%;
  top: 0;
  transform: translateX(-400%);
  z-index: 1;
`

function GlobalLoading() {
  const isFetching = useIsFetching()
  return (
    <PacmanLoader
      loading={isFetching}
      color={"rgba(175, 47, 47, 0.25)"}
      size={15}
      css={loaderCss}
    />
  )
}

export default GlobalLoading
2
3
4
5
6
7
8
9
10
11
12
13
14
15
16
17
18
19
20
21
22
23
24
25
5 React Modal

npm install react-modal
import { useState } from "react";
import Modal from "react-modal";

Modal.setAppElement("#root");

function App() {
  const [modalIsOpen, setModalIsOpen] = useState(false);
  // onRequestClose: 在请求关闭弹框时执行该回调函数 (单击弹框主体区域外部或按ESC键)
  // shouldCloseOnOverlayClick: 点击弹框主体区域外部时是否关闭弹框, 配合 onRequestClose 一起使用
  // 比如按ESC关闭弹框, 点击弹框主体区域外部不关闭弹框
  return (
    <>
      <button onClick={() => setModalIsOpen(true)}>打开弹框</button>
      <Modal
        style={{
          overlay: {
            backgroundColor: "rgba(100,100,100,0.5)",
          },
          content: {
            color: "skyblue",
          },
        }}
        isOpen={modalIsOpen}
        onRequestClose={() => setModalIsOpen(false)}
        shouldCloseOnOverlayClick={false}
      >
        sdfsd
        <button onClick={() => setModalIsOpen(false)}>关闭弹框</button>
      </Modal>
    </>
  );
}

export default App;
2
3
4
5
6
7
8
9
10
11
12
13
14
15
16
17
18
19
20
21
22
23
24
25
26
27
28
29
30
31
32
33
34
6 React Player

npm install react-player
import ReactPlayer from "react-player"

function App() {
  return (
    <ReactPlayer
      onStart={() => console.log("onStart calllback")}
      onEnded={() => console.log("onEnded calllback")}
      onPause={() => console.log("onPause calllback")}
      width="auto"
      muted={true}
      controls
      url="//vjs.zencdn.net/v/oceans.mp4"
    />
  )
}

export default App
2
3
4
5
6
7
8
9
10
11
12
13
14
15
16
17
7 React Datepicker
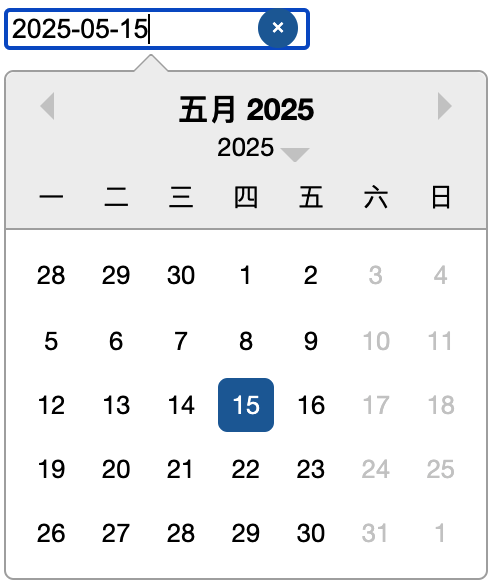
npm install react-datepicker date-fns
import DatePicker, { registerLocale, setDefaultLocale } from "react-datepicker"
import { useState } from "react"
import { addDays, subDays } from "date-fns"
import zhCN from "date-fns/locale/zh-CN"
import "react-datepicker/dist/react-datepicker.css"

// 注册语言
registerLocale("zh-CN", zhCN)
// 全局设置日期选择框语言
setDefaultLocale("zh-CN")

// subDays: 基于给定的日期减去指定的天数
// addDays: 基于给定的日期添加指定的天数

export default function App() {
  const [selectedDate, setSelectedDate] = useState(new Date())
  // minDate 能够选择的最早的日期
  // maxDate 能够选择的最晚的日期
  // dateFormat 日期格式化
  // onChange 当用户选择日期后执行的回调函数, 回调函数的参数就是用户选择的日期
  // selected 默认选中的日期
  // filterDate 日期过滤
  // showTimeSelect  显示时间选择
  return (
    <DatePicker
      selected={selectedDate}
      onChange={date => setSelectedDate(date)}
      dateFormat="yyyy-MM-dd hh:mm:ss"
      filterDate={date => date.getDay() !== 6 && date.getDay() !== 0}
      minDate={subDays(new Date(), 2)}
      maxDate={addDays(new Date(), 2)}
      showTimeSelect
    />
  )
}
2
3
4
5
6
7
8
9
10
11
12
13
14
15
16
17
18
19
20
21
22
23
24
25
26
27
28
29
30
31
32
33
34
35
8 React Table
8.1 概述
1. 为什么学习 React Table
- 使用表格进行数据可视化是不可避免的。
- 构建自己的表格组件可能会充满挑战。
2. React Table
React Table 用于构建强大的可扩展的数据表格,是一组钩子函数的集合,使用什么功能就调用什么钩子函数。
- React Table 采用无头设计,即不提供 UI 样式,开发者可以完全控制表格如何呈现,所以它不是表格组件,而是表格的实用工具集。
- 功能强大,提供了过滤,排序,分组,分页和列固定等等功能。
- React Table 是可扩展的,因为它拥有自己的插件系统,使开发者可以覆盖或扩展React Table 内部的逻辑步骤,阶段或过程。
npm install react-table@7.6.3 dateformat@4.5.1 react-table-sticky@1.1.3 styled-components@5.2.3
8.2 Basic Table
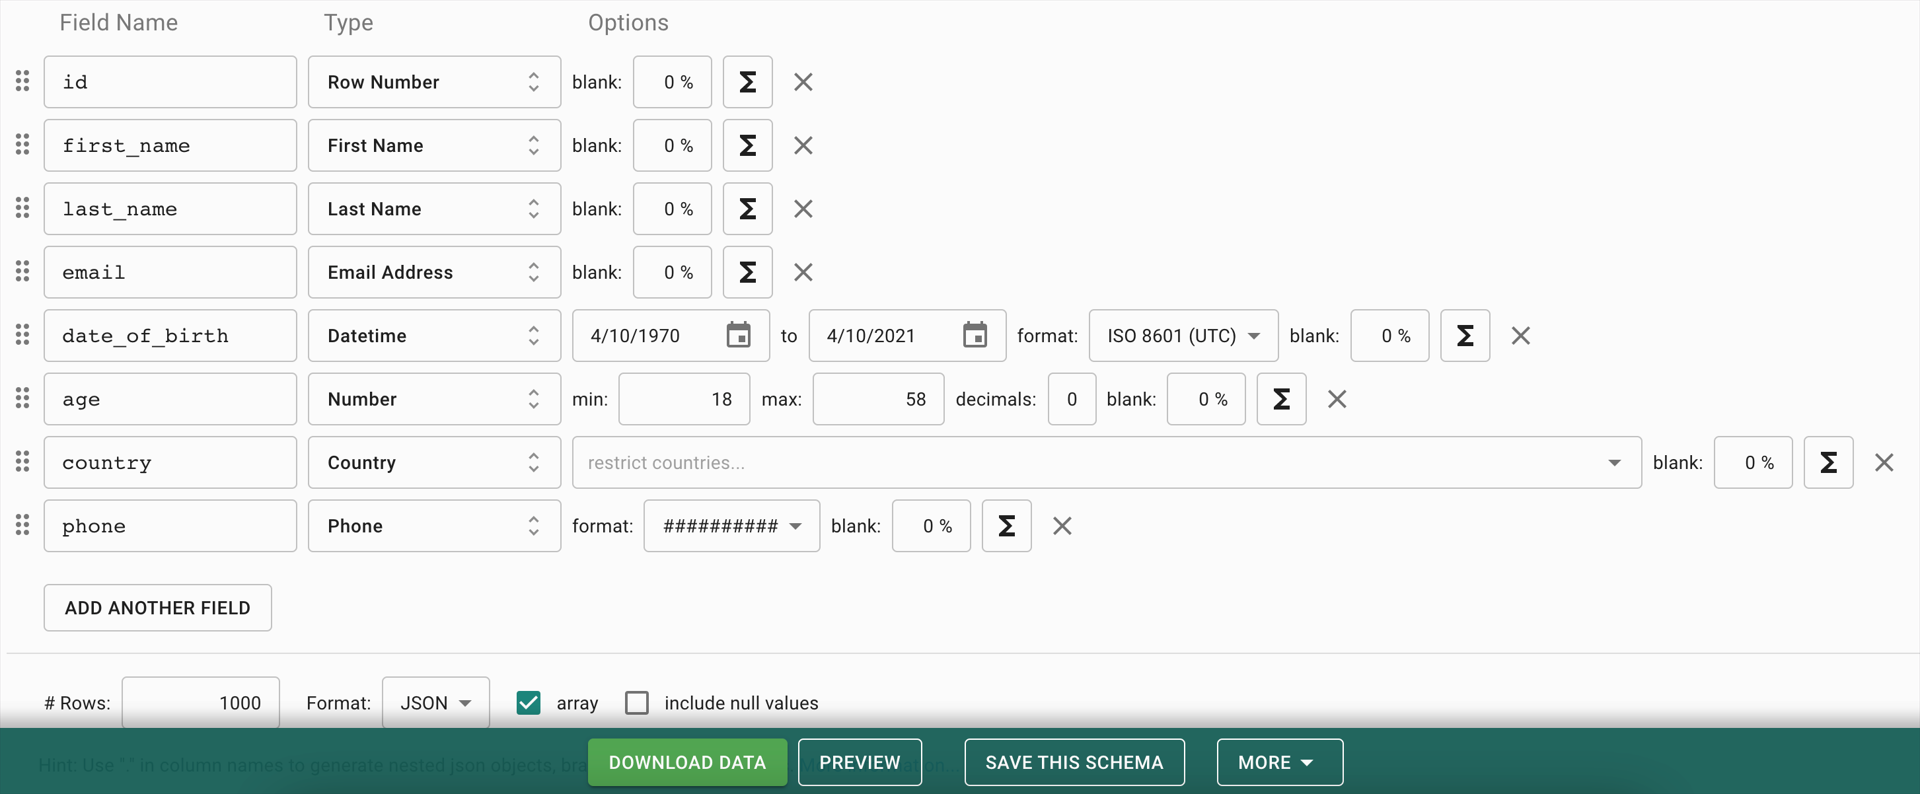
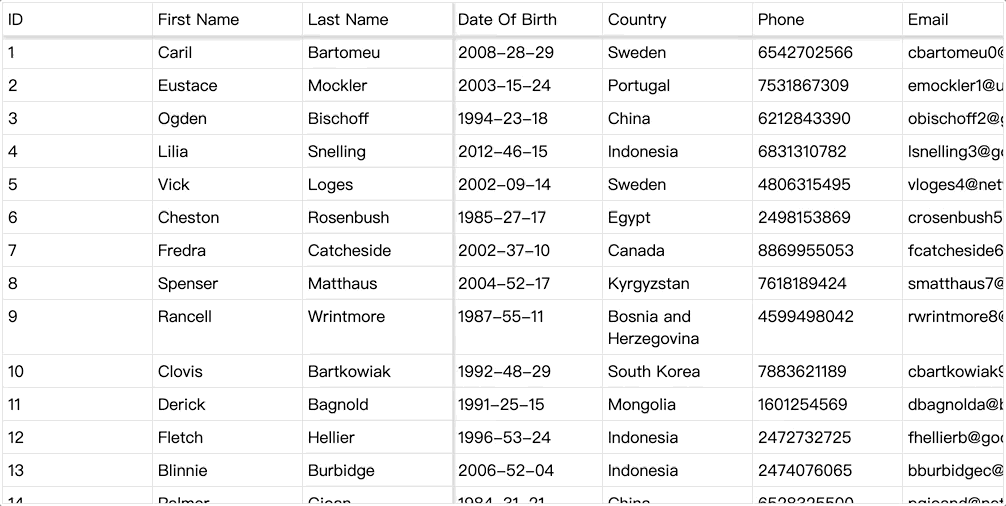
获取要展示的数据。 生成模拟数据:mockaroo
定义表格的列。
使用 react-table 创建表格实例对象并传入要展示的数据和列信息。
使用 HTML 定义一个基本的表格结构。
将表格实例对象信息赋值给 HTML,展示数据。
引入 CSS 文件为表格添加样式 样式来源。
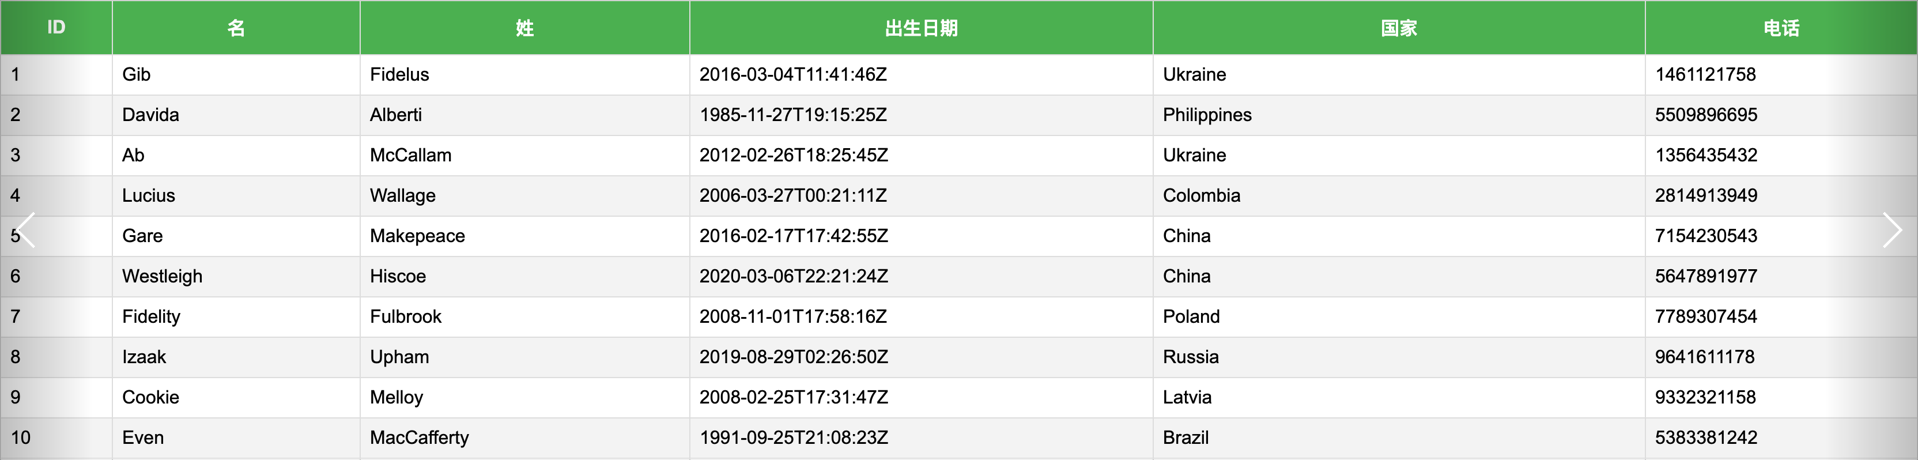
// columns.js
// Header: 定义页头列名称
// accessor: 定义列关联的数据属性
export const COLUMNS = [
  {
    Header: "ID",
    accessor: "id"
  },
  {
    Header: "名",
    accessor: "first_name"
  },
  {
    Header: "姓",
    accessor: "last_name"
  },
  {
    Header: "出生日期",
    accessor: "date_of_birth"
  },
  {
    Header: "国家",
    accessor: "country"
  },
  {
    Header: "电话",
    accessor: "phone"
  }
]
2
3
4
5
6
7
8
9
10
11
12
13
14
15
16
17
18
19
20
21
22
23
24
25
26
27
28
29
// BasicTable.js
import { COLUMNS } from "./columns"
import MOCK_DATA from "./MOCK_DATA.json"
import { useMemo } from "react"
import { useTable } from "react-table"
import "./table.css"

const BasicTable = () => {
  // 缓存列信息
  const columns = useMemo(() => COLUMNS, [])
  // 缓存表格数据
  const data = useMemo(() => MOCK_DATA, [])
  // 创建表格实例对象
  const {
    // 获取 table 标记属性
    getTableProps,
    // 获取 tbody 标记属性
    getTableBodyProps,
    // 获取表格页头信息
    headerGroups,
    // 获取表格中要展示的数据
    rows,
    // 计算要显示的行信息 (比如分页, 当前页要显示哪些行)
    prepareRow
  } = useTable({
    columns,
    data
  })
  return (
    <>
      <table {...getTableProps()}>
        <thead>
          {headerGroups.map(headerGroup => (
            <tr {...headerGroup.getHeaderGroupProps()}>
              {headerGroup.headers.map(column => (
                <th {...column.getHeaderProps()}>
                  {column.render("Header")}
                </th>
              ))}
            </tr>
          ))}
        </thead>
        <tbody {...getTableBodyProps()}>
          {rows.map(row => {
            prepareRow(row)
            return (
              <tr {...row.getRowProps()}>
                {row.cells.map(cell => (
                  <td {...cell.getCellProps()}>{cell.render("Cell")}</td>
                ))}
              </tr>
            )
          })}
        </tbody>
      </table>
    </>
  )
}

export default BasicTable
2
3
4
5
6
7
8
9
10
11
12
13
14
15
16
17
18
19
20
21
22
23
24
25
26
27
28
29
30
31
32
33
34
35
36
37
38
39
40
41
42
43
44
45
46
47
48
49
50
51
52
53
54
55
56
57
58
59
60
table {
  font-family: Arial, Helvetica, sans-serif;
  border-collapse: collapse;
  width: 100%;
}

table td,
table th {
  border: 1px solid #ddd;
  padding: 8px;
}

table tr:nth-child(even) {
  background-color: #f2f2f2;
}

table tr:hover {
  background-color: #ddd;
}

table th, tfoot td {
  padding-top: 12px;
  padding-bottom: 12px;
  text-align: center;
  background-color: #4caf50;
  color: white;
}
2
3
4
5
6
7
8
9
10
11
12
13
14
15
16
17
18
19
20
21
22
23
24
25
26
27
8.3 创建表格页脚

// columns.js
// Footer: 定义页脚列名称
export const COLUMNS = [
  {
    Footer: "ID",
  },
  {
    Footer: "名",
  },
  {
    Footer: "姓",
  },
  {
    Footer: "出生日期",
  },
  {
    Footer: "国家",
  },
  {
    Footer: "电话",
  }
]
2
3
4
5
6
7
8
9
10
11
12
13
14
15
16
17
18
19
20
21
22
const BasicTable = () => {
  // 获取表格页脚信息
  const { footerGroups } = useTable({})
  return (
    <table>
      <tfoot>
        {footerGroups.map(footerGroup => (
          <tr {...footerGroup.getFooterGroupProps()}>
            {footerGroup.headers.map(column => (
              <th {...column.getFooterProps()}>{column.render("Footer")}</th>
            ))}
          </tr>
        ))}
      </tfoot>
    </table>
  )
}
2
3
4
5
6
7
8
9
10
11
12
13
14
15
16
17
8.4 创建表格分组
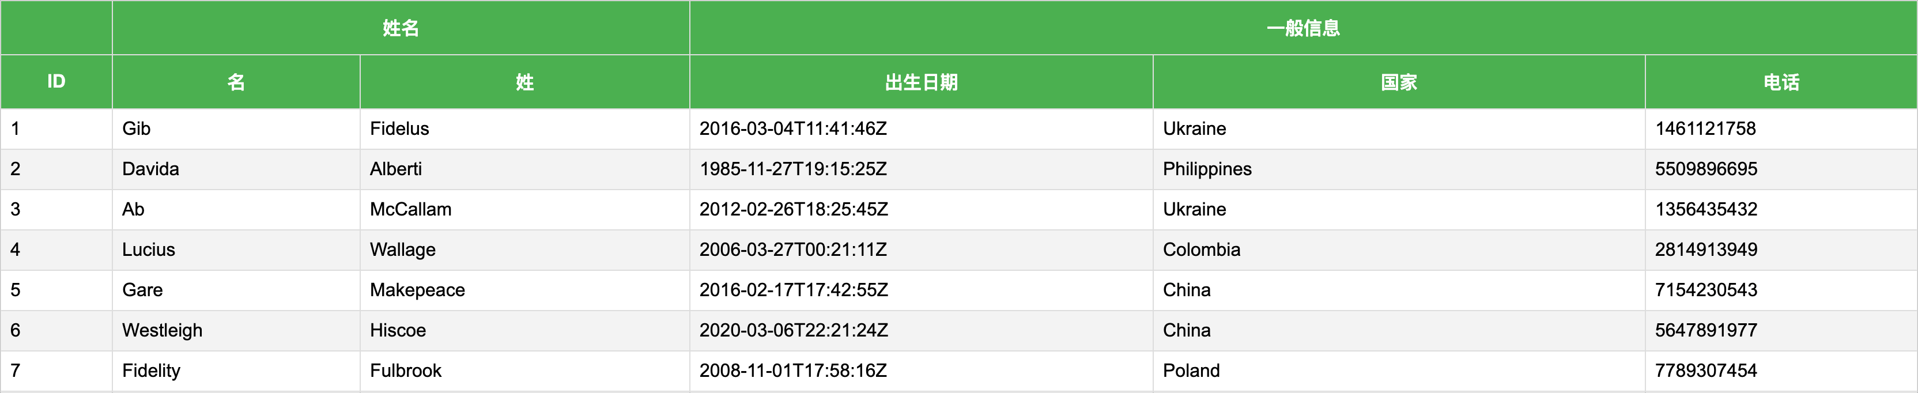
// columns.js
export const COLUMNS_GROUP = [
  {
    Header: "ID",
    Footer: "ID",
    accessor: "id"
  },
  {
    Header: "Name",
    Footer: "Name",
    columns: [
      {
        Header: "First Name",
        Footer: "First Name",
        accessor: "first_name"
      },
      {
        Header: "Last Name",
        Footer: "Last Name",
        accessor: "last_name"
      }
    ]
  },
  {
    Header: "Info",
    Footer: "Info",
    columns: [
      {
        Header: "Date Of Birth",
        Footer: "Date Of Birth",
        accessor: "date_of_birth"
      },
      {
        Header: "Country",
        Footer: "Country",
        accessor: "country"
      },
      {
        Header: "Phone",
        Footer: "Phone",
        accessor: "phone"
      }
    ]
  }
]
2
3
4
5
6
7
8
9
10
11
12
13
14
15
16
17
18
19
20
21
22
23
24
25
26
27
28
29
30
31
32
33
34
35
36
37
38
39
40
41
42
43
44
45
// BasicTabel.js
import { COLUMNS_GROUP } from "./columns"

const BasicTable = () => {
  const columns = useMemo(() => COLUMNS_GROUP, [])
}
2
3
4
5
6
8.5 实现表格排序

// SortingTable.js
import { useTable, useSortBy } from "react-table"

const SortingTable = () => {
  useTable({}, useSortBy)
  // column.getSortByToggleProps()
  // 将标记的鼠标移入样式改为手势, 表示该列是可以点击的
  // 实现点击列后, 对列数据进行排序 (升序, 降序, 默认排序交替)
  return (
    <thead>
      <th {...column.getHeaderProps(column.getSortByToggleProps())}>
        {column.render("Header")}
        <span>
          {column.isSorted ? (column.isSortedDesc ? "↓" : "↑") : ""}
        </span>
      </th>
    </thead>
  )
}
2
3
4
5
6
7
8
9
10
11
12
13
14
15
16
17
18
19
8.6 单元格内容格式化

日期格式化:yarn add dateformat
import dateformat from "dateformat"

export const COLUMNS = [
  {
    Header: "Date Of Birth",
    Footer: "Date Of Birth",
    accessor: "date_of_birth",
    Cell: ({ value }) => dateformat(value, "yyyy-mm-dd")
  }
]
2
3
4
5
6
7
8
9
10
8.7 实现全局过滤

// GlobalFilter.js
// 进行全局搜索的搜索框组件
const GlobalFilter = ({ filter, setFilter }) => {
  return (
    <div>
      搜索:{" "}
      <input
        value={filter}
        onChange={event => setFilter(event.target.value)}
      />
    </div>
  )
}

export default GlobalFilter
2
3
4
5
6
7
8
9
10
11
12
13
14
15
import { useGlobalFilter } from "react-table"
import GlobalFilter from "./GlobalFilter"

const FilterTable = () => {
  const { state, setGlobalFilter } = useTable({}, useGlobalFilter)
  const { globalFilter } = state
  return (
    <>
      <GlobalFilter filter={globalFilter} setFilter={setGlobalFilter} />
      <table></table>
    </>
  )
}
export default FilterTable
2
3
4
5
6
7
8
9
10
11
12
13
14
8.8 实现列过滤

// ColumnFilter.js
// 进行列搜索的搜索框组件
const ColumnFilter = ({ column }) => {
  const { filterValue, setFilter } = column
  return (
    <div>
      搜索:{" "}
      <input
        value={filterValue}
        onChange={event => setFilter(event.target.value)}
      />
    </div>
  )
}
export default ColumnFilter
2
3
4
5
6
7
8
9
10
11
12
13
14
15
// FilterTable.js
import { useFilters } from "react-table"

const FilterTable = () => {
  const { } = useTable({}, useFilters, useGlobalFilter)
  return (
    <thead>
      <th>
        <div>
          {column.canFilter ? column.render("Filter") : null}
        </div>
      </th>
    </thead>
  )
}
export default FilterTable
2
3
4
5
6
7
8
9
10
11
12
13
14
15
16
// columns.js
import ColumnFilter from "./ColumnFilter"

export const COLUMNS = [
  {
    Header: "ID",
    Footer: "ID",
    accessor: "id",
    Filter: ColumnFilter
  }
]
2
3
4
5
6
7
8
9
10
11
8.9 禁用过滤

在表格中的某一列不想使用过滤,需要显式进行声明,否则报错,声明如下:
// columns.js
export const COLUMNS = [
  {
    Header: "ID",
    Footer: "ID",
    accessor: "id",
    disableFilters: true
  }
]
2
3
4
5
6
7
8
9
8.10 设置默认列属性
在每一列中 Filter 配置选项的值都是一样的,通过配置默认列可以去除重复配置。
// FilterTable.js
import ColumnFilter from "./ColumnFilter"

const FilterTable = () => {
  const defaultColumn = useMemo(() => ({ Filter: ColumnFilter }), [])
  const {} = useTable({ defaultColumn })
}
export default FilterTable
2
3
4
5
6
7
8
然后删除 columns.js 文件中的 Filter 配置选项。
8.11 实现过滤防抖
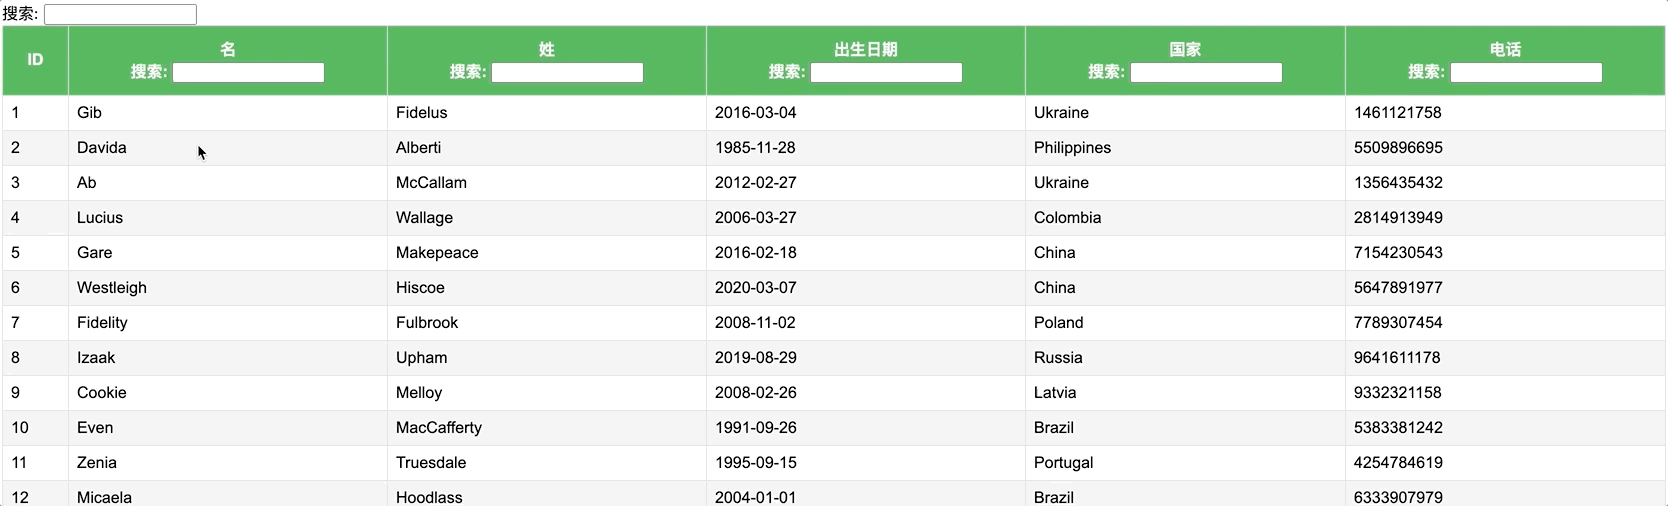
// GlobalFilter.js
import { useAsyncDebounce } from "react-table"
import { useState } from "react"

const GlobalFilter = ({ filter, setFilter }) => {
  const [value, setValue] = useState(filter)
  const onChange = useAsyncDebounce(() => {
    setFilter(value)
  }, 1000)
  return (
    <div>
      搜索:{" "}
      <input
        value={value || ""}
        onChange={event => {
          setValue(event.target.value)
          onChange()
        }}
      />
    </div>
  )
}
export default GlobalFilter
2
3
4
5
6
7
8
9
10
11
12
13
14
15
16
17
18
19
20
21
22
23
8.12 实现基本分页
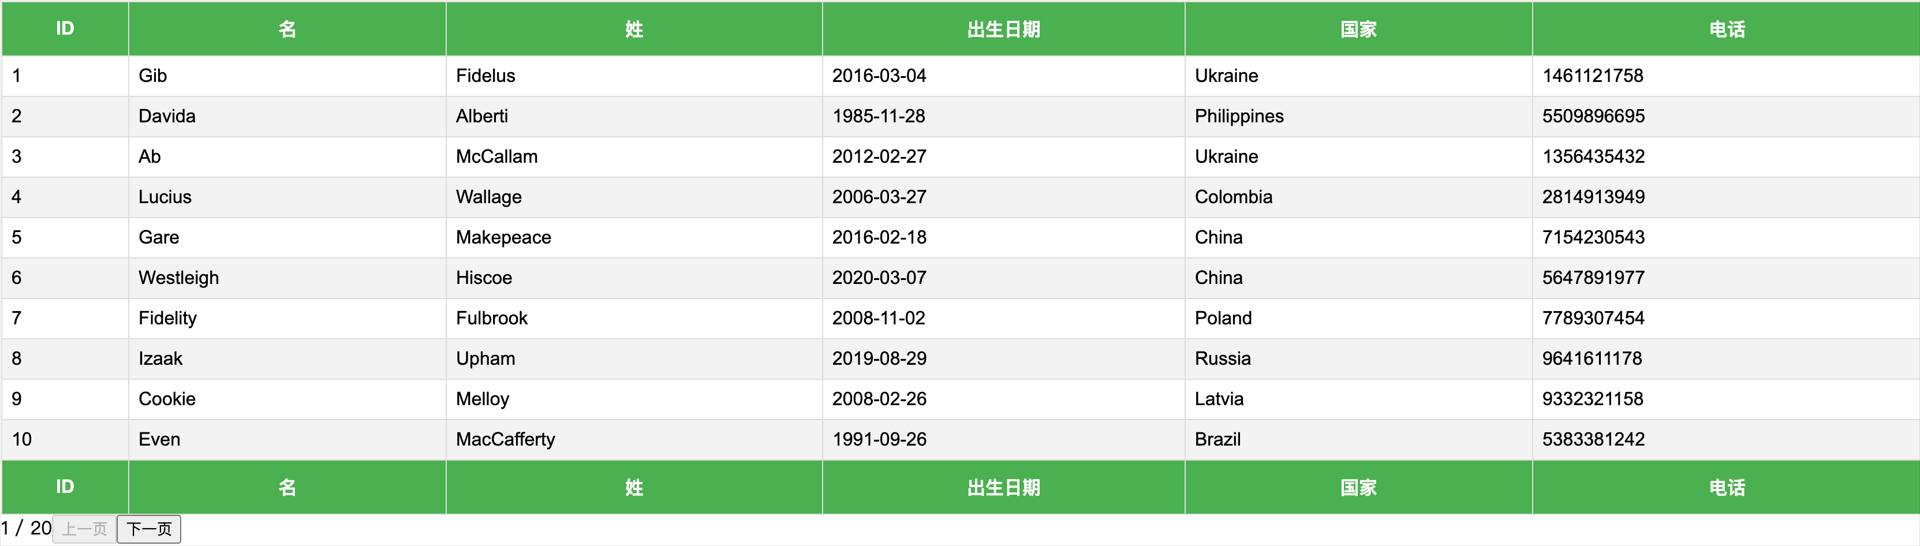
// PaginationTable.js
import { usePagination } from "react-table"

const PaginationTable = () => {
  const {
    // 分页数据
    page,
    // 跳转到下一页
    nextPage,
    // 跳转到上一页
    previousPage,
    // 是否存在下一页
    canNextPage,
    // 是否存在上一页
    canPreviousPage,
    // 一共有多少页
    pageCount,
    state,
  } = useTable({}, usePagination)
  // 页码
  const { pageIndex } = state

  return (
    <>
      <table>
        <tbody>
          {page.map(row => {})}
        </tbody>
      </table>
      <div>
        <span>
          {pageIndex + 1} / {pageCount}
        </span>
        <button disabled={!canPreviousPage} onClick={() => previousPage()}>
          上一页
        </button>
        <button disabled={!canNextPage} onClick={() => nextPage()}>
          下一页
        </button>
      </div>
    </>
  )
}
export default PaginationTable
2
3
4
5
6
7
8
9
10
11
12
13
14
15
16
17
18
19
20
21
22
23
24
25
26
27
28
29
30
31
32
33
34
35
36
37
38
39
40
41
42
43
44
8.13 实现页码跳转

import { usePagination } from "react-table"

const PaginationTable = () => {
  const { gotoPage } = useTable({ initialState: { pageIndex: 3 } }, usePagination)
  return (
    <div>
      <span>
        跳转到:{" "}
        <input
          type="number"
          style={{ width: 50 }}
          value={pageIndex + 1}
          onChange={event => gotoPage(Number(event.target.value) - 1)}
         />
      </span>
      <button disabled={!canPreviousPage} onClick={() => gotoPage(0)}>
        第一页
      </button>
      <button disabled={!canNextPage} onClick={() => gotoPage(pageCount - 1)}>
        最后一页
      </button>
    </div>
  )
}

export default PaginationTable
2
3
4
5
6
7
8
9
10
11
12
13
14
15
16
17
18
19
20
21
22
23
24
25
26
8.14 设置数据显示条数

import { usePagination } from "react-table"

const PaginationTable = () => {
  const { setPageSize } = useTable({initialState: {pageSize: 25}})
  const { pageSize } = state

  return (
    <select value={pageSize} onChange={event => setPageSize(Number(event.target.value))}>
      {[10, 25, 50].map(pagesize => (
        <option key={pagesize} value={pagesize}>
          显示 {pagesize} 条数据
        </option>
      ))}
    </select>
  )
}

export default PaginationTable
2
3
4
5
6
7
8
9
10
11
12
13
14
15
16
17
18
8.15 实现选择行数据
// Checkbox.js
import { forwardRef } from "react"
// 将 indeterminate 从 props 单独解构出来, 它不能直接被添加到 input 身上
// ref: 因为 react-table 要为复选添加功能, 要对其进行操作, 所以通过 Ref 的方式获取该复选
// rest: 通过 props 的方式向复选框中添加属性以实现复选框的单选和全选功能
const Checkbox = forwardRef(({ indeterminate, ...rest }, ref) => {
  return <input type="checkbox" ref={ref} {...rest} />
})

export default Checkbox
2
3
4
5
6
7
8
9
10
// RowSelection.js
// 实现选择行数据功能
import { useRowSelect } from "react-table"
// 通过此复选框选择行数据
import Checkbox from "./Checkbox"

const RowSelection = () => {
  const {
    // 选择的结果数组
    selectedFlatRows
  } = useTable({ columns, data }, useRowSelect, hooks => {
    // 在初始化表格实例对象时调用
    // hooks: 对象, 钩子函数集合
    // 以编程方式向表格中添加列
    hooks.visibleColumns.push(columns => {
      // columns 现有的列数据
      return [
        {
          id: "selection",
          Header: ({ getToggleAllRowsSelectedProps }) => (
            // 实现全选功能
            <Checkbox {...getToggleAllRowsSelectedProps()} />
          ),
          // 实现单选功能
          Cell: ({ row }) => <Checkbox {...row.getToggleRowSelectedProps()} />
        },
        ...columns
      ]
    })
  })

  // 只显示前 10 条数据
  const firstPageRows = rows.slice(0, 10)

  return (
    <div>
      {JSON.stringify(
        { selectedRows: selectedFlatRows.map(row => row.original) },
        null,
        2
      )}
    </div>
  )
}

export default RowSelection
2
3
4
5
6
7
8
9
10
11
12
13
14
15
16
17
18
19
20
21
22
23
24
25
26
27
28
29
30
31
32
33
34
35
36
37
38
39
40
41
42
43
44
45
46
8.16 更改列顺序

在更改列顺序时,需要使用到列 id,对列 id 排序就是对列进行排序 。在没有为列添加 id 属性时, accessor 默认为列的 id。
// ColumnOrder.js
import { useColumnOrder } from "react-table"

const ColumnOrder = () => {
  const { setColumnOrder } = useTable({}, useColumnOrder)
  return (
    <button
      onClick={() =>
        setColumnOrder([
          "id",
          "first_name",
          "last_name",
          "phone",
          "country",
          "date_of_birth"
        ])
       }
      >
      更改列书序
    </button>
  )
}

export default ColumnOrder
2
3
4
5
6
7
8
9
10
11
12
13
14
15
16
17
18
19
20
21
22
23
24
8.17 显示隐藏列

// ColumnHiding.js
import Checkbox from "./Checkbox"

const ColumnHiding = () => {
  const {
    // 列信息数组
    allColumns,
    // 显示和隐藏所有列
    getToggleHideAllColumnsProps
  } = useTable()
  return (
    <div>
      <div>
        <Checkbox {...getToggleHideAllColumnsProps()} /> 显示/隐藏所有列
      </div>
      {allColumns.map(column => (
        <div key={column.id}>
          <Checkbox {...column.getToggleHiddenProps()} /> {column.Header }
        </div>
      ))}
    </div>
  )
}
export default ColumnHiding
2
3
4
5
6
7
8
9
10
11
12
13
14
15
16
17
18
19
20
21
22
23
24
8.18 实现列固定
创建样式化组件,为表格设置样式 simple-example
// TableStyles.js
import styled from "styled-components"

export const Styles = styled.div`
  .table {
    border: 1px solid #ddd;

    .tr {
      :last-child {
        .td {
          border-bottom: 0;
        }
      }
    }

    .th,
    .td {
      padding: 5px;
      border-bottom: 1px solid #ddd;
      border-right: 1px solid #ddd;
      background-color: #fff;
      overflow: hidden;

      :last-child {
        border-right: 0;
      }
    }

    &.sticky {
      overflow: scroll;
      .header,
      .footer {
        position: sticky;
        z-index: 1;
        width: fit-content;
      }

      .header {
        top: 0;
        box-shadow: 0px 3px 3px #ccc;
      }

      .footer {
        bottom: 0;
        box-shadow: 0px -3px 3px #ccc;
      }

      .body {
        position: relative;
        z-index: 0;
      }

      [data-sticky-td] {
        position: sticky;
      }

      [data-sticky-last-left-td] {
        box-shadow: 2px 0px 3px #ccc;
      }

      [data-sticky-first-right-td] {
        box-shadow: -2px 0px 3px #ccc;
      }
    }
  }
`
2
3
4
5
6
7
8
9
10
11
12
13
14
15
16
17
18
19
20
21
22
23
24
25
26
27
28
29
30
31
32
33
34
35
36
37
38
39
40
41
42
43
44
45
46
47
48
49
50
51
52
53
54
55
56
57
58
59
60
61
62
63
64
65
66
创建 StickyTable 组件
先拷贝 BasicTable 组件,在此基础上进行修改。
在 react-table-sticky 此处拷贝 JSX 。
// StickyTable.js
// useBlockLayout
// 为 row, cell 添加固定宽度
// 将 row 的 display 设置为 flex
// 将 cell 的 display 设置为 inline-block
// 将 cell 的 box-sizing 设置 border-box
import { useBlockLayout } from "react-table"
import { useSticky } from "react-table-sticky"
import { Styles } from "./TableStyles"

const StickyTable = () => {
  const {} = useTable({}, useBlockLayout, useSticky)
  return (
    <Styles>
      <div
        {...getTableProps()}
        className="table sticky"
        style={{ width: 1000, height: 500 }}
      >
        <div className="header">
          {headerGroups.map(headerGroup => (
            <div {...headerGroup.getHeaderGroupProps()} className="tr">
              {headerGroup.headers.map(column => (
                <div {...column.getHeaderProps()} className="th">
                  {column.render("Header")}
                </div>
              ))}
            </div>
          ))}
        </div>
        <div {...getTableBodyProps()} className="body">
          {rows.map(row => {
            prepareRow(row)
            return (
              <div {...row.getRowProps()} className="tr">
                {row.cells.map(cell => (
                  <div {...cell.getCellProps()} className="td">
                    {cell.render("Cell")}
                  </div>
                ))}
              </div>
            )
          })}
        </div>
      </div>
    </Styles>
  )
}

export default StickyTable
1
2
3
4
5
6
7
8
9
10
11
12
13
14
15
16
17
18
19
20
21
22
23
24
25
26
27
28
29
30
31
32
33
34
35
36
37
38
39
40
41
42
43
44
45
46
47
48
49
50指定固定列,添加 Email,Age 列。
// columns.js
export const COLUMNS = [
  {
    Header: "ID",
    Footer: "ID",
    accessor: "id",
    disableFilters: true,
    sticky: "left"
  },
  {
    Header: "First Name",
    Footer: "First Name",
    accessor: "first_name",
    sticky: "left"
  },
  {
    Header: "Last Name",
    Footer: "Last Name",
    accessor: "last_name",
    sticky: "left"
  },
  {
    Header: "Date Of Birth",
    Footer: "Date Of Birth",
    accessor: "date_of_birth",
    Cell: ({ value }) => dateformat(value, "yyyy-MM-dd")
  },
  {
    Header: "Country",
    Footer: "Country",
    accessor: "country"
  },
  {
    Header: "Phone",
    Footer: "Phone",
    accessor: "phone"
  },
  {
    Header: "Email",
    Footer: "Email",
    accessor: "email"
  },
  {
    Header: "Age",
    Footer: "Age",
    accessor: "age"
  }
]
1
2
3
4
5
6
7
8
9
10
11
12
13
14
15
16
17
18
19
20
21
22
23
24
25
26
27
28
29
30
31
32
33
34
35
36
37
38
39
40
41
42
43
44
45
46
47
48